
Introduction to the Arduino Uno R3 Board
What is Arduino?
Arduino is an open-source electronics platform based on easy-to-use hardware and software. It is specially designed for students, hobbyists, engineers, and anyone interested in creating electronic projects and automation systems.
The Arduino platform allows users to read inputs such as sensors, buttons, and switches, then control outputs like LEDs, motors, displays, and relays. Because of its simplicity and flexibility, Arduino has become one of the most popular development platforms in the world.
Arduino Uno R3
The Arduino Uno R3 is the most popular and beginner-friendly Arduino board. It is widely used in educational projects, robotics, home automation, IoT systems, and embedded electronics.
The word “Uno” means “one” in Italian, and “R3” stands for Revision 3, which is the latest standard version of the board.
The board is built around the ATmega328P microcontroller and can be programmed using the Arduino IDE software.
Main Features of Arduino Uno R3
FeatureDescriptionMicrocontrollerATmega328POperating Voltage5VInput Voltage7V – 12V RecommendedDigital I/O Pins14 PinsPWM Pins6 PinsAnalog Input Pins6 PinsFlash Memory32 KBSRAM2 KBEEPROM1 KBClock Speed16 MHzUSB ConnectionUSB Type-B
Components on the Arduino Uno R3 Board
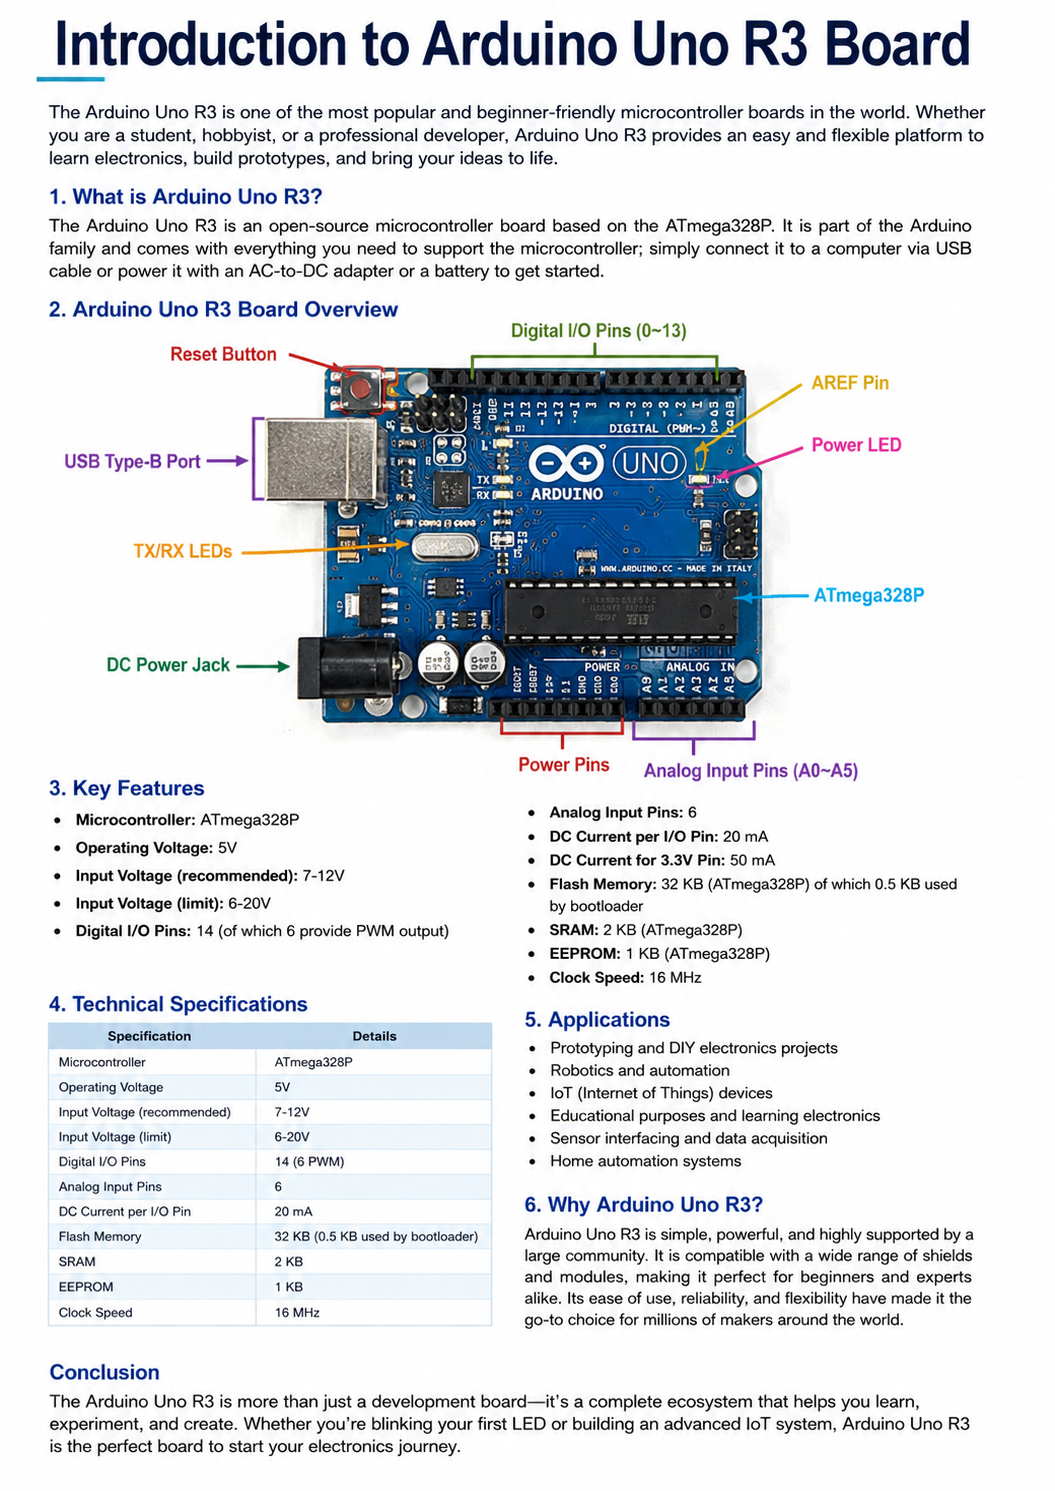
1. ATmega328P Microcontroller
This is the main brain of the board. It processes data and executes the uploaded program.
2. Digital Pins
The board has 14 digital input/output pins numbered from 0 to 13. These pins can be used to control LEDs, relays, motors, and other devices.
3. PWM Pins
Pins 3, 5, 6, 9, 10, and 11 support PWM (Pulse Width Modulation). These pins can simulate analog output for controlling motor speed or LED brightness.
4. Analog Pins
Pins A0 to A5 are analog input pins used for reading analog sensor values such as temperature sensors, light sensors, and potentiometers.
5. USB Port
The USB port is used to upload code from the computer and also provide power to the board.
6. DC Power Jack
This allows the board to be powered using an external adapter or battery.
7. Reset Button
The reset button restarts the microcontroller and runs the program again.
8. Crystal Oscillator
The 16 MHz crystal oscillator controls the timing and speed of the microcontroller.
Advantages of Arduino Uno R3
Easy to learn and use
Large online community support
Open-source hardware and software
Compatible with many sensors and modules
Low cost and widely available
Ideal for beginners and professionals
Applications of Arduino Uno R3
Arduino Uno R3 is used in many electronic and automation projects including:
- Robotics projects
- Home automation systems
- Smart agriculture systems
- Temperature monitoring systems
- IoT projects
- LED lighting control
- Security systems
- DIY electronic projects
- Industrial automation prototypes
How Arduino Uno R3 Works
The Arduino Uno works by receiving input signals from sensors or switches. The microcontroller processes the data according to the uploaded program and sends output signals to connected devices.
For example:
- A temperature sensor detects room temperature.
- Arduino reads the sensor value.
- If the temperature becomes high, Arduino turns on a cooling fan.
- This simple process makes Arduino extremely useful for automation systems.
Programming Arduino Uno R3
Arduino boards are programmed using the Arduino IDE software.
Programs written for Arduino are called “Sketches.”
Example Blink Program:
void setup() { pinMode(13, OUTPUT); } void loop() { digitalWrite(13, HIGH); delay(1000); digitalWrite(13, LOW); delay(1000); }
This simple program blinks the built-in LED every second.
Why Beginners Prefer Arduino Uno R3
Arduino Uno R3 is highly recommended for beginners because:
- Simple hardware design
- Easy programming language
- Huge number of tutorials online
- Large community support
- Compatible with countless modules and sensors
- Even users without electronics experience can quickly start building projects.
Common Sensors and Modules Used with Arduino Uno R3
Some popular modules used with Arduino include:
- Ultrasonic Sensor
- DHT11 Temperature Sensor
- Relay Module
- Servo Motor
- LCD Display
- Bluetooth Module
- WiFi Module ESP8266
- Soil Moisture Sensor
- Rain Sensor Module
- RFID Module
Powering the Arduino Uno R3
The board can be powered in several ways:
- USB Cable
- DC Adapter
- Battery Pack
- VIN Pin
Recommended input voltage is between 7V and 12V.
Safety Tips
Avoid applying more than 12V directly.
Double-check wiring connections.
Disconnect power before changing circuits.
Use proper current-limiting resistors with LEDs.
Conclusion
The Arduino Uno R3 is one of the best development boards for learning electronics and programming. Its simplicity, affordability, and flexibility make it ideal for beginners, students, makers, and engineers.
Whether you want to build a simple LED project or a complete automation system, Arduino Uno R3 provides an excellent starting point.
With thousands of tutorials, modules, and community resources available online, learning Arduino has never been easier.
Learn More
Visit the official Arduino website:
For Arduino boards, sensors, modules, and DIY electronics accessories in Sri Lanka:


Add comment